Showing posts with label Home Canning. Show all posts

Thursday, September 18, 2014

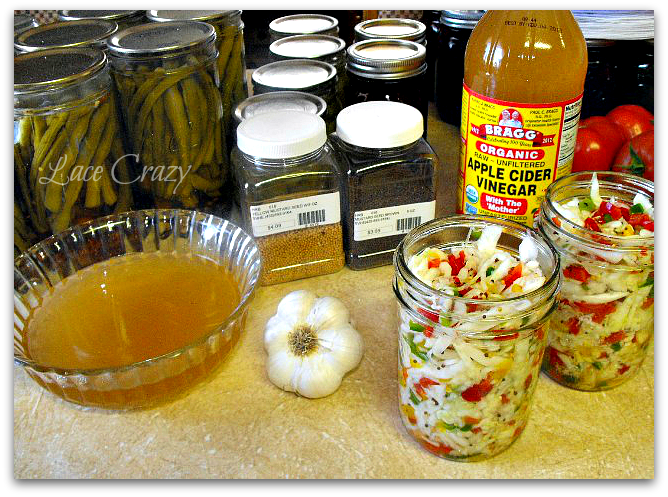
Pickled Cabbage & Peppers ~ Home Canning Recipe...


This is a recipe from "The Joy of Pickling"...
Use it in place of Sauerkraut at your house. 
You can serve it hot, or cold.

~Pickled Cabbage & Peppers~

2 lbs. Cabbage - cored & shredded
5 C. Bell Peppers - chopped small
1/4 C. Pickling Salt
1 C. Sugar
1 1/2 C. Apple Cider Vinegar
1/2 tsp. Red Pepper Flakes
2 tsp. Yellow Mustard Seeds
2 tsp. Brown Mustard Seeds
6 Cloves Garlic - minced small


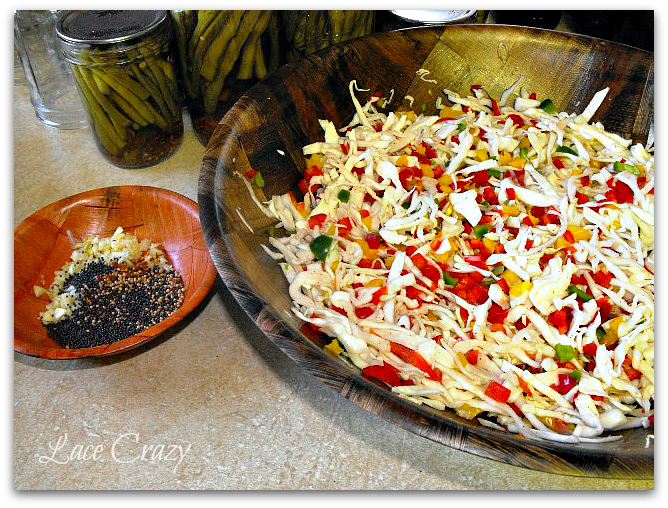
1. In a large 'non-reactive' bowl (don't ever use aluminum!) - toss the cabbage & peppers with the salt.
Cover and let them sit for about 12 hours to sweat the moisture out.


2. In a 'non-reactive' saucepan, combine the sugar and vinegar. Bring to a boil.

3. Rinse the salt off of the cabbage and peppers and drain really well. (I put a piece of plastic wrap over the top and push down hard to shove the excess moisture out through the strainer...) 

4. Toss the cabbage & peppers with the pepper flakes, mustard seeds and minced garlic.


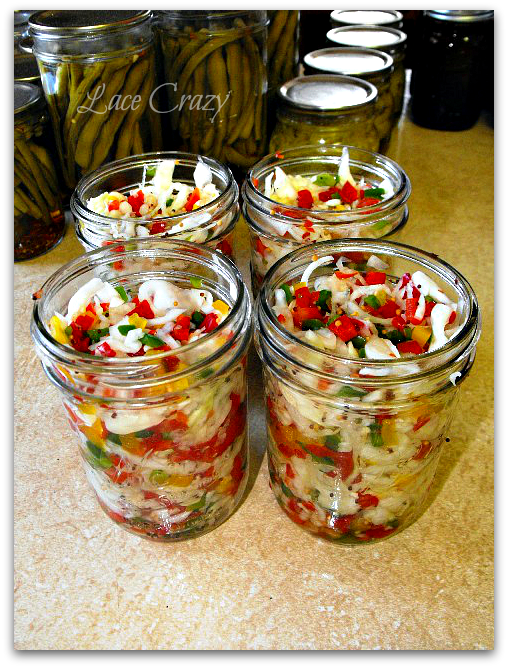
5. Pack 4 Pint Jars tightly with the cabbage / pepper mix and ladle the hot brine over the mixture giving time for it to settle. Leaving 1/2" headspace.


6. Run a non-metallic object down the inside of the jars to let air bubbles escape, wipe rims clean and seal jars with hot lids and rings.

7. Process the jars in a boiling water bath for 20 minutes. 

    ~ Please adjust your processing time to your altitude!~


Tuesday, September 9, 2014

Pickled Beets ~ Home Canning Recipe...


Pickled Beets Recipe:
(Approx. 7 Pints)

Enough cooked, skinned and cubed beets to fill 7 pint jars. 
How many beets fill 7 pint jars?
Your guess is as good as mine on this...
It just depends upon how big your beets are. 
Wing it~!

To prepare the beets, cut the beet greens off leaving 1" of the greens hooked to the top of the beet. 
If you leave a bit of beet green at the top, your pan of water won't turn bright red and your beets will retain their color while they're cooking...

(I always have a lot of help when I'm out in the garden)

Then, wash the beets and put them in a pan of water - bring them to a boil and cook until the beets are tender and the skins 'slip off' easy. 
Once the beets are skinned, cut the beets into cubes and put them in a bowl.

Sterilize and prepare your jars, rings & lids for canning & get your boiling water canner going on the stove ~ 

This pickled beet brine recipe came from one of my best friends. 
It's the simplest recipe ever, and the best. And, I've tried lots of them in the past. This one is my favorite~!

Pickled Beet Brine:
1 Quart of White Sugar
1 Quart of White Vinegar
1 Quart of Water

Bring the pickling brine to a boil in a larger sauce pan and then add the cubed beets and let them boil for a few minutes to bring the beets up to temperature, before you put them in the jars.

(I bottle in the evening and my kitchen hates my camera - it always turns the pics yellow...)

Put a couple cups of water in a small pan and bring it to a boil - remove it from the stove and place your new canning lids in the hot water for about 5 min. to soften the rubber rings, before you seal your bottles...


Fill your sterilized jars with your hot, cubed beets...


Then fill the jars with the hot pickling brine. Leave about 1/2" head-space at the top of the jar for expansion.

Run a 'non' metallic utensil down the side of the jar to get the air bubbles out...

Wipe the rims of your jars clean with a wet cloth, or paper towel and put your lids and bands on. 


Put the jars in boiling water in your boiling water canner and process to your altitude's processing time. 
Mine get processed for 10 min. I'm at about 5800' in altitude here in Central Utah. 


When the jars are done processing, move them to a draft free location to cool overnight. 

When they're cool, check that all of your lids have sealed
(push down in the center, they should all be 'concave' if any pop up and down put them in the fridge and use them soon - the lid didn't seal - don't store them without them sealed.)

Then, remove the rings... 
(do not store your jars with the rings on - the rings get rusty over time...)

Wipe down your jars and lids and put them in a cool, dark spot for storage.

These pickled beets take a few months to mature. 
They are awesome after a few months, but heavenly after about 6 months.


Enjoy~!!!
~~Blooper~~


Friday, September 13, 2013

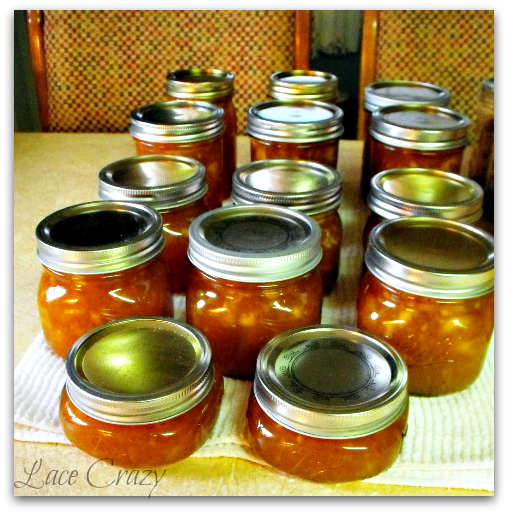
Award Winning Peach Jam ~ canning recipe...

I have been busy today making "Peach Jam"...


If you love jam and you like peaches, you have got to try this one ~ 
It's a little bit of work, but it's so worth it~!


There is a time consuming step to do first, to make this recipe - you need to make some 'Candied Ginger' - Or, you could buy some, if that suits you. I make my own...

There are easy recipe's and there are kind of intense recipes to make 'Candied Ginger." The way I do it is kind of 'intense,' but it is very worth it in the end...


Candied Ginger Recipe
1 lb. Fresh Ginger Root
Water ~
1 Vanilla Bean
20 Whole Cardamom Pods, cracked open...
2" piece of Cinnamon Stick
2 1/2 C. Sugar
1/2 tsp. Ground Cinnamon
1/4 tsp. Ground Cardamom

1. Scrape peelings off of Ginger with the edge of a spoon.
2. Place Ginger in a 3 qt. saucepan and add enough water to cover.
3. Cut the Vanilla Bean length wise & scrape the seeds. Add the seeds & pod to the water & Ginger.
4. Add the Cardamom Pods & Cinnamon Stick.
5. Bring to a boil & cook at a low simmer for about 40 min., or until Ginger is tender.
6. Drain Ginger & remove spices ~ don't worry about the Cardamom Seeds, but remove the pods...
7. In an empty saucepan, mix 1/3 C water with 2 C. Sugar and bring to a boil.
8. Add the Ginger and cook at a boil, stirring frequently, for 20 min.
9. Reduce heat to med/low & continue to cook & stir until the syrup begins to thicken ~ about another 10 to 15 min.
10. In a bowl, mix the reaming 1/2 C. Sugar, Ground Cinnamon & Ground Cardamom & set aside...
11. As the Ginger begins to thicken, the syrup will look like foamy bubbles when stirred rather than bubbles in liquid. At this point, lift the Ginger out of the pan and into the sugar mixture in the bowl. Toss to coat and spread out on a sheet pan to cool.
~ Store in a jar~

*** Collect all the extra sugar in your bowl & process it in a food processor until a fine consistency and use the "Ginger Sugar" for baking~ I use it on my Snickerdoodle cookies, or in tea~!***


This "Candied Ginger" recipe makes about a pint sized jar full - it keeps in a jar for years, if candied correctly. This amount of "Candied Ginger" lasts me for my baking needs for about 3 years, so usually I already have it on hand for making jam...


Award Winning Peach Jam Recipe
8 C. Peaches (pitted, peeled, mashed with your fingers)
4 Tbsp. Fresh Lemon Juice
6 Tbsp. Powdered Fruit Pectin (1 box)
7 C. Sugar
1 Tbsp. Finely Chopped, Candied Ginger
1/4 tsp. Fresh Grated Ginger Root
1/2 tsp. Nutmeg
1/2 tsp. Cinnamon
1/4 tsp. Ground Cloves
1/4 tsp. Allspice
Zest from 1/2 Lemon

1. In a small bowl combine; chopped Candied Ginger, grated Ginger Root, Nutmeg, Cinnamon, Cloves, Allspice and Lemon Zest ~ set aside.
2. In a medium bowl, put 7 C. of sugar ~ set aside.
3. In a Large saucepan, over medium heat, bring the peaches and lemon juice to a boil.
4. Add the pectin and return to a bowl, stirring constantly to avoid scorching.
5. Add the sugar to the boiling peaches and while stirring constantly, bring the mixture back to a full rolling boil. (A rolling boil cannot be 'stirred down' - a simmer can be 'stirred down' it needs to be at a rolling boil)
6. Add the spices ~ stir well and boil for 1 minute.
7. Skim the foam & fill your jars leaving 1/4" headspace.
8. Process in a boiling water canner for 10 min.

*This recipe makes 6 1/2 pints of jam*


While I was coming home from Denver at the beginning of the week (yes it was even raining and flooding then...) I stopped at 'Kokopelli's' fruit stand on I-70, North of Grand Junction and bought some organic peaches. They were as big as softballs and yummy!

I had enough to make 12 pint jars of jam and 2, half pints of jam - 

This is our favorite jam recipe and it's always worth making...


If you like "Peach Jam," give this recipe a try ~ 

You won't be disappointed~!


Wednesday, September 11, 2013

Pickled Cauliflower ~ Home Canning Recipe~!

Here's a great 'Home Canning' recipe to bottle some of the great priced, Autumn veggies for the winter.

This is the same recipe as my "Pickled Carrot Recipe", but they all taste different depending upon the veggies you pickle....


Pickled Cauliflower Recipe: 
(Approx. 7 Pints)

Approx. 2 to 3 Large heads of Cauliflower (cut up for bottling)
1/2 tsp. Celery Seed (per jar)
1/2 tsp. Mustard Seed (per jar)
1/2 tsp. Dill Seed (per jar)
1/2 tsp. Crushed Red Pepper Flakes (per jar)
Slices of Celery (optional - use what you would like, per jar)
Sliced Carrots (optional - use what you would like, per jar)
7 small Pickling Onions (one per jar)
7 Cloves of Garlic (one per jar)
5 C. White Vinegar
5 C. Water
1/2 C. Pickling Salt

Sterilize & prepare your jars, rings & lids for canning~
Put spices in each jar...
Add one pickling onion and one clove of garlic to each jar.
I put a couple of carrot slices and a few small pieces of celery and then fill the jars with cauliflower, leaving a bit of room on top to add another thin carrot slice and a thin slice of celery to the top. 
Leave about 1/2" headspace on top -

Bring your water, vinegar and salt to a boil -

Ladle hot brine over veggies. Run a non-metallic utensil down the inside to get the air bubbles out. Wipe your jar rims, put on your lids and rings and I process for the time specified on a canning altitude chart. 

You can find your proper time for your altitude at the National Center for Home Food Preservation Webpage


I used 6, 2 lb. heads of Cauliflower & it bottled 25 pint jars of pickles


I let them sit and brine for at least 6 weeks before I open a jar to eat. 
The longer they sit in the brine, the better they get~!


I love this time of the year, when there is an abundance of produce...


Me & a friend both ordered a Bountiful Basket and she got the add on 25# of cauliflower for $14 and we split it, to both do some pickled cauliflower.


Enjoy your pickles~!

Sunday, April 21, 2013

25# of Pickled Carrots + The Recipe~!

For all of you ladies out there that still participate in "Home Canning" & bottle your own foods, here's a great recipe for pickled carrots. Or, if you have never bottled before, but have always wanted to try it, I'll walk you through it. Just keep reading...

This 'Pickled Carrot' recipe was derived from an old 'Dilly Bean' recipe and me and a friend have used it to pickle nearly everything but the kitchen sink... (recipe & instructions below)


I got my carrots to pickle from "Bountiful Baskets"
And, I'm Very Impressed with my 'Bountiful Basket' this week...

I got three packages of blackberry's <yummy>, 2 honey dew melons, red potatoes, apples, small tangerines, 2 romaine lettuce, tomatoes, 3 cucumbers, 8 anahiem peppers, broccoli and bananas...
Plus, I got an add on 25# bag of "Monster Carrots"

I say "Monster Carrots," because these behemoths are massive ~ but very sweet & not overgrown...

If you've never tried a "Bountiful Basket," you can check it out here: http://www.bountifulbaskets.org/
They have great prices on bulk produce sometimes...

My Basket this week...
Cost = $15.00 + $10.50 for the bulk carrots


What does a person do with 25# of carrots?
Why pickle them of course...


If you're eager to learn how and see the recipe, click "Read More"...