Have you ever had the inclination to do something different?
To "doll" something up a bit?
To add a feature ~ add some bling?
Well, here's a neat idea to add something to something, for mere pennies and a bit of extra time. And, it's fun. And, if you don't like it, it's easy to scrape it off, wipe it down and start again~!
I've never tried this with "Gel Medium," or "Spackle Medium," or any of the other application process'. I've only done this with "Joint Compound." Mainly, because I usually have a little bucket of it in the cupboard for minor fixes and such, so why go out in search of something else to use, when I've had great success with the joint compound...
You just hold a stencil to the surface you would like to embellish. Use a small trowel (I prefer the plastic ones) to trowel a bit of joint compound over the stencil. Remove the stencil while the joint compound is wet "carefully" and let it dry. When it's dry, you can use a bit of sand paper to sand it down smoother, if you wish. Just sand with a soft touch.
It's not hard to add a raised stencil, it's easy. And, in the end, you can change the whole look of something with a couple moments of your time...
Want to know more?
Click on "Read More" below...
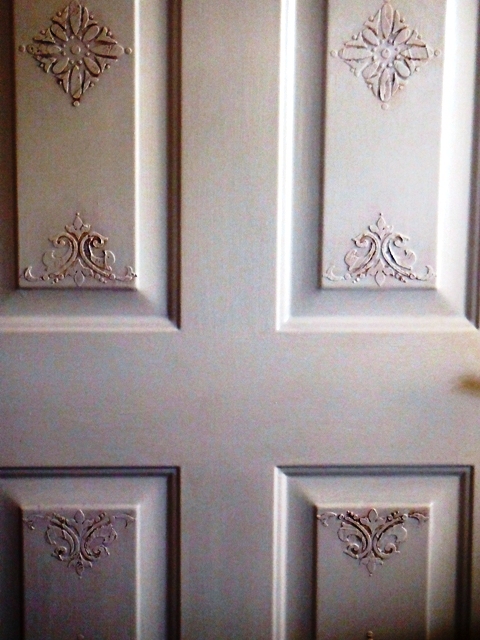
You can take that 'blah,' metal, 4 panel door you get sick of looking at and perhaps, give it a personal touch and give it the mirage of having some hand carved embellishments...
My front door in this old house is brand new ~ albeit 15 years old 'brand new.' It's just that nobody has lived here since the new door was installed. So, even though it's an 'old' door, it's a 'new, old door'...
It is just a simple 4 panel, metal door with a half moon window in the top. Nothing special. Nothing personalized. BORING...
How is a girl to fix this? Well, a splat of "Joint Compound" and a little glaze, of course~!
Someday, I'm going to get this entry way completed ~ of course, that will be when we get the next add-on to the house 'added-on' next year. So, for right now, you just get a sneak peek, because it's my make-shift office and it sort of looks like a paperwork bomb, or missile went off in here right now. And, if I put things away ~ I'll be spending alot of time trying to find my paper because at the moment, there's just no where to put them away to... (=
(I'm just coping with it...)
It doesn't mean a girl can't 'side step' and carefully bypass all the stacks of paper on the floor and play with the door does it? Just don't accidentally step backwards without looking over your shoulder, or that nice stack of construction paperwork you had so carefully placed in that pile, in the entryway, might end up all over the entryway floor ~ dang... We'll need to fix that soon~!
It's ok...
Nobody uses this door ~ yet... <he, he...>
Yep, the windows and door glass are messing with me and my camera -
The color of the trim in the living room and entry way is "Powdered Snow" and the top of the chair rail is painted a caramel color, while the bottom of the chair rail is a "Faux Leather" wall treatment. You can see pics of the living room and entryway here: Living Room & Entry Way And, you can also see how I done the faux leather wall treatment in this post: Faux Leather Wall Tutorial ~ this was one of my early on blog posts, so you'll have to scroll down through it, to see the instructions...
With the deep, rich, colors and all that pretty leather and the Hand Carved Russian Pine Furniture in the house, I wanted a little something on the door, versus just a BORING raised panel door...
I think I accomplished my goal by using some raised stencils...
To get the 'old world,' 'hand carved' appearance, I put a new coat of paint on the door - yes, paint right over the raised stencils as your base coat... I glazed over the raised stencil with some glaze that matches my faux leather. And, I rolled the white paint with a roller back over the stencil lightly, when the glaze was dry. I guess, it was like a "Paint Subtraction" sort of method?
Paint over the stencils ~ add glaze over the stencils ~ paint lightly back over the stencils...
It blends into the entry ways appearance and even though nobody uses this door yet, I've been asked on multiple occasions where I got it and how I done it... I always say, "It's just a metal door" and then, they have to go touch it... While I giggle of course. It just has the appearance of a painted wood door. But, it's not......
That's the goal ya know...
Gaining some attention for your bling & confusing your friends...
I love it~!
It cost me nothing but a bit of time. And, NOBODY has a door like it~!
It's simple to do...
Raised Stencils are fun to play with...
Raised Stencils change the look of nearly anything your brave enough to do it on and you can take something everybody has and customize it to suit your personality and decor with little effort...
Horrible pic ~ I know~!
But, feel special because I moved all my heaping hoards of stacked paper out from in front of it to get you this 'sneak peek,' because I like you~ even though my picture taking ability is lacking compared with my adding bling ability...Someday, these renovations and add-on's to this old house will all be completed and organization and good housekeeping practices will prevail. Until such time though ~ enjoy my door~!
Here's a few more 'raised stencil' ideas, from projects I've completed, to further inspire you to give it a try...


love the stencils! I have been meaning to do some of my doors with stencils but never get to it.You did a great job
ReplyDeleteGilly
Oh Gilly...
DeleteGive it a try. It only takes a few minutes to do it. About an hour, or so, to dry before you paint. Don't just do your doors... Do everything that needs a little bling~!
It really is a fun way to dress something up for a couple pennies...
Have an AWESOME WEEK~!
(=
Projects like this are so rewarding! It takes little money, time or effort, yet the impact is so great. It really does transform the door. Thanks for joining the Rock ‘N Share! Have a great day, D@TheShadyPorch
ReplyDeleteThanks for having me D...
DeleteThis is a fun and cheap project to do~!
(=
oh this is beyond gorgeous! it is brilliant in its simplicity and impact and those are the best! thanks for this demo, and no, your pics are not horrible, they're just perfect! I love this....am going to try it one day soon, will bookmark this post and thanks for sharing!
ReplyDeleteThank you for the kind comment...
DeleteIt is so simple, it's almost silly, but with an unbelievable 'high class' result. Seriously, things like this are what happens when you hand me joint compound and a trowel - a bit of paint and then let boredom reign... lol
=)