Yes, she has a few "Cracks"...
But, everything has a crack in it ~ that's how the light gets in...
She has such promise, although the inside is where I've devoted my energy through this last winter and she is turning out 'Gorgeous' and "One of a Kind"~!
=)
So, a "Begining" & "After" tour, starting with the living room to date, is in order...
To some, she would be an 'awful colored' old house, of which she was and would require alot of work, of which she does and their wish would be to make her look new. My aim here is NOT to ever make her look new. But, just to change some colors, fix some fixes and make her look rich and, 'farm-housy' and of course, well cared for... I know, that's not a word, but it is the one 'not-a-word' that describes my goal and passion here ~ "Farmhousy"... I just want her to have a face lift. To make her warm and inviting. To make her mine and to give her some class, but not change what she is... I want her to look like we've lived here our whole lives...
Living Room Now...
Living Room Before...
Oy' Vey'... !!!
Oh my, oh my...
Oh my, oh my...
You have to look through the ruckus and look past the color to see the beauty...!
I admit though, it took me months and months of thinking on it to figure out how to make that salmon fireplace fit in with some color scheme that would fit my personality. I love the 'French Flair' and I'm attracted to the pics and the beautiful decorating schemes, but I'm such a "Western Chic" at heart. I knew, if I went with something "too feminine," I would regret it~!
I admit though, it took me months and months of thinking on it to figure out how to make that salmon fireplace fit in with some color scheme that would fit my personality. I love the 'French Flair' and I'm attracted to the pics and the beautiful decorating schemes, but I'm such a "Western Chic" at heart. I knew, if I went with something "too feminine," I would regret it~!
In the end, she has to be deep and rich and welcoming and yet fit a certain personality type ~ MINE...
This poor girl needs a "Makeover"~!
To be honest, I couldn't stand to be in the interior of this house before, with the color scheme I inherited. It made me nauseous... Believe it, or not, my better half paid top dollar, years and years ago, for this crazy peach and sponged nightmare... I think it was back in the days of when they were all "COLORBLIND"
Of course, that was before he met me. Had he done this while with me, he would have been shot!
So, I snapped a few pics and I spent hours and hours looking at them. I copied the pics and hung them on my 'idea' wall in my office and mulled and thought and dreamed and pondered. Unfortunately, this is one of the better 'hit and run' pics I took - look past all the busy'ness of the furniture "in storage" and look past all the insane, mismatched chaos and you will see beauty...
I did...
And, we didn't live in this home, we lived in my home for 11 years, so this old house was just our makeshift, mismatched, furniture storage unit... My house has 2 bathrooms, this old farmhouse has 1, so we lived at my house until the kids were raised (2 girls). But, this old, turquoise, farmhouse called my name at night, in my dreams, it yearned to be redone. To have someone live in her again. To have someone love her again. She longed to be cared for...
It took me 11 years to plot her redo, to plan my attack, to get brave enough and most of all, to tolerate the peach walls long enough for a recolor~!
My, oh my... How to fix this?
From the begining, I had my mind set on leather walls. How in the world does a woman go about fulfilling this want? Is there a special paint? Could I do it with plaster? Just a flat, faux, glaze job? Would that give me the look and depth I dreamed?
No... None of those would pacify my insane need for 'leather perfection', so I spent months longer trying to figure out a way, a means, a simple procedure to get the texture and look I so longed for...
My better half was at the paint department at Ace Hardware one afternoon and came upon some Suede paint... hmmm... I studied the procedure, the reviews, the drawbacks, the look... It wasn't suede my heart desired at all. It was deep, rich, textured, old type book leather. Wow, as if a leather wall treatment wasn't hard enough to figure out, I had my mind set on a leather wall treatment only my mind could envision ~
Nothing generic ~ it had to be a 'Lace Crazy,' one of a kind, leather wall attack!
Then, one day while surfing pics on google ~ seems to be my favorite past time~ I came across a 'faux' leather treatment that would fit my needs...
You can view it yourself here ~
Thanks for the idea Karen~!
Why the hell not... It only involved crumpled paper bags, wall paper glue, some type of colors and polyurethane. How simple, or hard, could that be?
It took me 2 weekends to do the leather and took my better half a week to paint everything prior to my paperbag adventures <And, this time, I PICKED THE COLORS>...
Not bad time input for a complete living room and entry way makeover~!
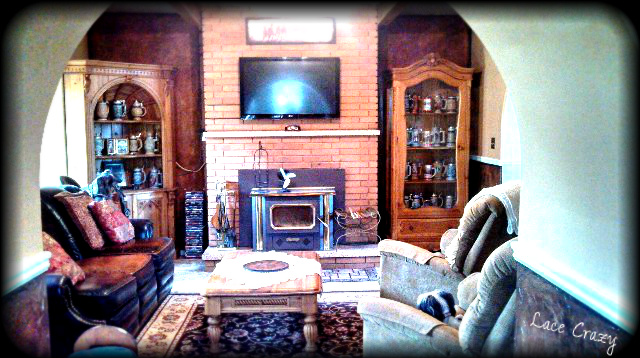
Living Room Current ~ but still under construction!
Please don't take notice to the white, 5 gallon, butcket on the floor with coal in it ~ duh!
Entryway North Wall
CAN YOU BELIEVE IT'S THE SAME ROOM???
Well, you tear pieces of brown paper - I used the small brown rolls of painters paper from Home Depot, located in the paint section.
You tear the paper into dinner plate size pieces and tear off the straight edges for the centers, or leave the straight edges on the pieces for the straight edges on your walls... Then, you crumple them up into little balls. Sounds so easy, but trust me, you need 10,000 pieces for a big room ~ Maybe more, maybe less, I just know it's ALOT~!
I ran out of steam and made my better half rip, crumple and unfold as I pasted.
Hey, pasting is hard enough and with all that wallpaper glue on your hands, it's impossible to unfold wadded balls of paper, so I nominated myself the paste'er~! I have a lot of talent with messing things up and my hell, I'm the bravest woman I know, so this was a cake walk...
You put the paste on the wall and you put the paper on the paste and you smoosh your hand over it to get the air bubles out, but not so much that you ruin the texture. Wait for it all to dry and add the color... Easy, Peasy~
Above pic is after the wall glazing - I used Behr Glaze from Home Depot and added a rich, dark, orange/brown pigment. I put the glaze right on the untreated paper and used a wet sponge and wet paper towel to swish it around how I wanted it to look. Then, I added one coat of Polyurethane. I needed more depth, so I used some Folkart acrylic paint in burnt umber and black and a wet papertowel to add some more variation and color over the top of the polyurethane when it dried.
***DON'T put acrylic paint straight onto the paper, or you'll just get a big blotch. It just soaks in with no chance to move it around.***
I still didn't have the look I wanted, so out came the magic brushes...
I've tole painted for years and years, so this is my specialty~!
How do you like all this 70's and 80's, mismatched furniture?
I swear, my 'man child' would have kept all this forever if it wasn't for my stern and demanding personality... The poor guy just gets attached. So, ignore the mess~ I certainly wasn't considering publishing these pics last year when I got 'snap happy' with the camera during the redo~!
I swear, my 'man child' would have kept all this forever if it wasn't for my stern and demanding personality... The poor guy just gets attached. So, ignore the mess~ I certainly wasn't considering publishing these pics last year when I got 'snap happy' with the camera during the redo~!
In the above pic, I added some shading, with acrylic tole paints and water. I shaded all around all the edges, in black and ooo'la'la... I was getting there quickly. It was turning out the vision in my mind...
In the above pic, you can see the texture and shading. It even feels like leather...
The color turned out perfect and well, wherever there was an issue, I would just smack a swish of black, watered down, acrylic paint and swoosh the issue to perfection... How AWESOME did this turn out??? I was smiling for months after this insane adventure that turned out so PERFECT...
Of course at a later date, I had to do the switch covers the same way, because I'm anal like that~
When completed, the walls got about 6 coats of polyurethane, to bring them to their current day, shiny, sealed, beautiful perfection. I even done the 2nd to last coat with a lambs wool roller, to give it kind of a pocked looked and to make the leather even richer in texture...
Yes, I LOVE my living room and entry way now...
But, it's still under construction, so stay tuned~!
Well, that's all for now. At least I have a begining of this crazy attempt at blogging...
I'll show you my laundry room / backporch adventure soon and it is just as exciting~!


.JPG)


No comments:
Post a Comment
Thank you for your comments...
I love to hear from you~!
=)